Hyun-Ju Yoo and Nammee Moon
Automated Print Quality Assessment Method for 3D Printing AI Data Construction
Abstract: The evaluation of the print quality of 3D printing has traditionally relied on manual work using dimensional measurements. However, the dimensional measurement method has an error value that depends on the person who measures it. Therefore, we propose the design of a new print quality measurement method that can be automatically measured using the field-of-view (FOV) model and the intersection over union (IoU) technique. First, the height information of the modeling is acquired from a camera; the output is measured by a sensor; and the images of the top and isometric views are acquired from the FOV model. The height information calculates the height ratio by calculating the percentage of modeling and output, and compares the 2D contour of the object on the image using the FOV model. The contour of the object is obtained from the image for 2D contour comparison and the IoU is calculated by comparing the areas of the contour regions. The accuracy of the automated measurement technique for determining, which derives the print quality value was calculated by averaging the IoU value corrected by the measurement error and the height ratio value.
Keywords: Data Construction , Dimensional Accuracy , Field-of-View (FOV) , Quality Assessment , 3D Printing
1. Introduction
A 3D printing is called by various names such as additive manufacturing (AM) or rapid prototyping (RP), and is classified into fused deposition materials (FDM), stereo lithography apparatus (SLA), selective laser sintering (SLS), digital light processing (DLP), Polyjet, laminated object manufacturing (LOM), etc. depending on the use. The 3D printing (AM) industry continues to grow annually in fields such as automobiles, architecture, aerospace, fashion, food, dentistry and medical care [1].
With the development of the 3D printing industry, the need for the performance and quality evaluation of equipment, materials, and printed materials is increasing. In addition, the data acquisition method and database establishment of the results based on the quality evaluation of the output are important for convergence with other technologies.
Currently, the quality evaluation of printouts is mainly carried out in three dimensions. It relates to shapes (such as surface shape and surface roughness), physical and chemical aspects (such as tensile strength, impact strength, thermal deformation temperature, heavy metals, and VOCs emissions), and reliability (such as weather resistance, impact resistance, heat aging resistance, and stain resistance) [2].
The method currently used to evaluate the accuracy and precision of printed materials uses a dimension-measuring device that can measure 0.01 mm or less to measure the dimensional error. If more accuracy is required, it can also be measured using a three-dimensional measuring machine. However, to evaluate the quality of printouts using a dimensional measuring machine, it is necessary to calculate the average value of repeated manual measurements several times for each usage. It is also difficult to immediately evaluate the quality because the output result can be different each time depending on the location of the output on the build plate; thus, the average value must be additionally measured and obtained. In addition, excessive time and cost are incurred in acquiring data for quality evaluation, building a database, and linking it with artificial intelligence.
Therefore, unlike the prior dimensional measurement method, this study evaluated the quality of the 3D printing output by using, the top view and isometric view information obtained through a camera, and the height information obtained through the height measurement sensor. Furthermore, this study proposes an automated measurement technique that uses the field-of-view (FOV) model to compare the resulting error between the acquired image information and the modeling. The quality of the output is evaluated by comparing the contours between the modeling and the measurement result.
2. Related Works
In recent years, studies have been conducted to optimize the conditions of AM printing for process safety and the improvement of print quality through standardization. Among them, a notable study relates to the optimization of FDM process parameters to improve the dimensional accuracy of prints using acrylonitrile butadiene styrene copolymer (ABS) resin [3]. These studies include the Taguchi experi¬men¬tal method, signal-to-noise ratio (SNR) analysis, analysis of variance (ANOVA), gray relationship analy¬sis (GRA), and artificial neural network (ANN), and analytical, numerical statistical, and empirical approaches including fuzzy logic. Studies evaluating the relationship between the optimization of process factors and the quality of printouts have been actively conducted [4], and dimension measurements are generally used in the evaluation of print quality. In the dimension measurement method, a 3D modeling file (STL) output from a 3D printer was used as a reference shape to evaluate the accuracy and precision of the output.
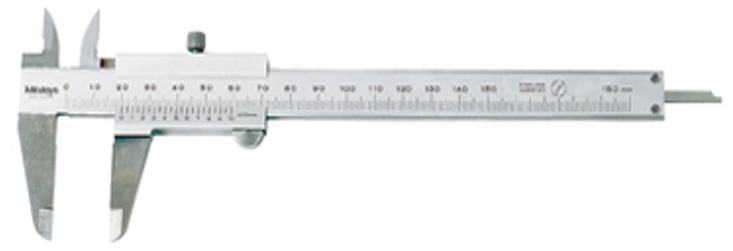
The position of the output of the reference shape is set such that the horizontal X-axis, vertical Y-axis, and height coincide with the Z-axis direction of the 3D printer. The production positions were output at the four outermost points and the center of the printable area, each at five locations. To measure the dimensions, the pre-processed output is measured by the line contact method using the vernier caliper dimension-measuring machine below, and the error value (Ai) and precision (D) are obtained through the following measurement formulas, respectively [5].
The X, Y, Z measurement values and their error values between the reference shape and the output are obtained using the vernier caliper in Fig. 1, X, Y, Z value information and deviations obtained through measurement are drawn up in a table as shown in Table 1.
Table 1.
| Case# | Width | Deviation | Depth | Deviation | Height | Deviation |
|---|---|---|---|---|---|---|
| 1 | 3.018 | 0.013 | 3.017 | 0.011 | 3.004 | 0.015 |
| 2 | 4.004 | 0.012 | 4.010 | 0.010 | 4.008 | 0.011 |
| [TeX:] $$\vdots$$ | [TeX:] $$\vdots$$ | [TeX:] $$\vdots$$ | [TeX:] $$\vdots$$ | [TeX:] $$\vdots$$ | [TeX:] $$\vdots$$ | [TeX:] $$\vdots$$ |
| n | 10.003 | 0.009 | 10.008 | 0.013 | 10.005 | 0.016 |
The average of all error values of each item is calculated as follows:
The estimate of the repeatability of each item is obtained as follows:
Finally, the output accuracy is obtained through as follows:
Based on the above dimensional measurement method, it is possible to optimize the design of the build plate temperature, nozzle temperature, print speed, etc., which are the major process factors that affect the quality of the external dimensions of the printed product. It recognizes process factors as continuous type, recognizes gradient model-based process factors as categorical types, and uses a general linear model that determines the process factor level based on the result value to verify the correlation between the output and process factors [6].
Final print quality evaluation through the comparison of printouts and CAD (computer-aided design) images is essential for designing an artificial intelligence model for selecting process parameters to improve the dimensional accuracy of the printed specimens through the FDM process and ensure the efficiency of the procedure. Regression-based machine learning can be used to predict dimensional deviations between a CAD model and the produced physical part [7].
As process factor optimization in 3D printing is a critical process, it is important to develop a direct correlation between the process parameters and 3D printed output properties through an ANN. Therefore, as shown in Table 2, studies [8-12] have been conducted to investigate the correlation between the major process factors and output results through an ANN based on the FDM method [13].
Table 2.
| Study | ANN input parameters | ANN output parameters |
|---|---|---|
| Sood et al. [8] | Layer thickness positioning raster angle/width air gap | Compressive strength |
| Vosniakos et al.[9] | Layer thickness positioning raster angle/width air gap | Wear |
| Equbal et al. [10] | Positioning slice width | Deposition error in volume |
| Sood et al. [11] and Vosniakos et al. [12] | Layer thickness positioning raster angle/width air gap | Dimensional precision |
In order to design an algorithm to derive the optimal printing process parameters through ANN, it is necessary to identify the relationship between the printing process parameters and the quality of the output, there are restrictions in building a database due to the time and physical limitations of the existing dimensioning method as described above. Therefore, this paper presents an automated measurement technique as a quality evaluation method for printouts.
3. Technologies for Automated Measurement Techniques
The automated measurement method proposed in this study uses the FOV and the IoU measurement methods. FOV is a technology that implements a virtual camera and calculates the view at the current location using camera parameters in 3D coordinates. The IoU digitizes and calculates the overlap between regions. The IoU quantifies and calculates the overlapping area. To use it, a contour method that can calculate the outermost line of an object is used to determine the outermost line for calculating the IoU. This section describes the techniques used in the proposed automated measurement technique.
3.1 Camera Parameter
Focal length refers to the distance from the front of the lens to the image sensor. Generally, it is expressed in pixel units, so it is easy to calculate during geometric analysis and image correction. The principal point refers the coordinates of the image where the center of the lens is located in the image sensor. If the sensor is level, the image center point and main point should match, and in general, the main point rather than the image center point is used for geometrical analysis.
3.2 FOV Model
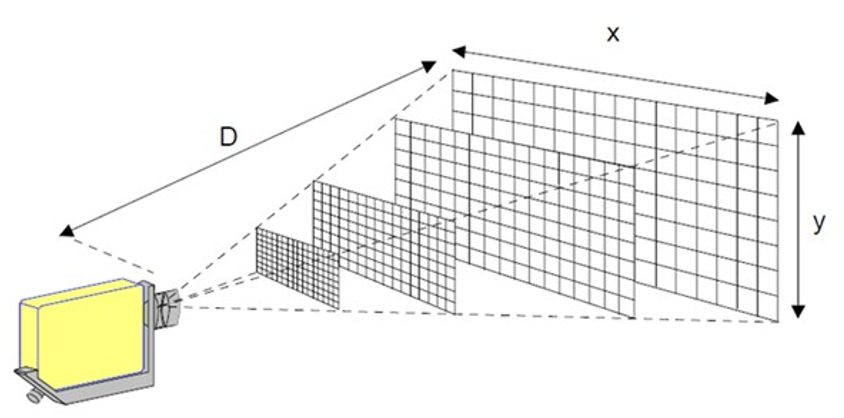
The FOV is used in various applications in various fields. The FOV in this study refers to the area visible from the camera. In general, a camera has a rectangular field of view where the width is larger than the length as shown in Fig. 2. Therefore, when expressing the FOV, it is expressed as in a diagonal line instead of horizontally or vertically. The FOV on the 3D screen is expressed as a value that describes the amount of space one screen will show. The formula for calculating the FOV from the camera can be obtained by multiplying the sensor size by the magnification of the lens as follows:
(4)
[TeX:] $$\text { FOV }_{\text {Horizontal }}=\text { Sensor }_{\text {size }}(\text { Width }) * \text { Lens }_{\text {Magnification }}$$
(5)
[TeX:] $$\text { FOV Vertical }=\operatorname{Sensor}_{\text {size }}(\text { Height }) * \text { Lens }_{\text {Magnification }}$$In other words, as shown in Fig. 2, the horizontal value corresponding to x is obtained as the product of the sensor width of the camera and lens magnification, and the vertical value corresponding to y is obtained as the product of the sensor height of the camera and lens magnification.
3.3 IoU
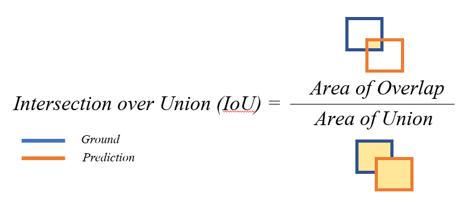
The IoU is an evaluation index mainly used to measure the accuracy of an object detector, and is a method of quantitatively indicating the degree of overlap between two areas. The calculation formula for IoU is expressed as [TeX:] $$(A \cap B) /(A \cup B)$$ as shown in equation below, and the closer to 1, the more overlapping areas.
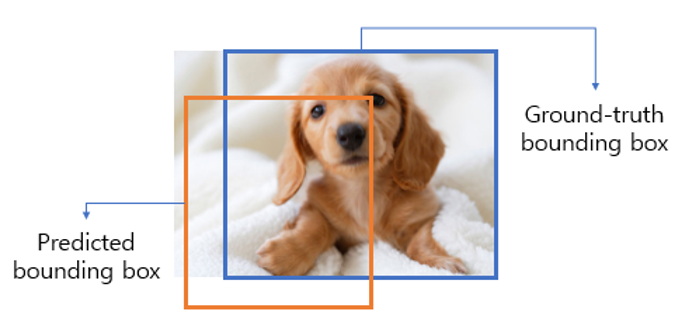
As shown in Fig. 3, when the area to be obtained is in the form of a straight rectangle horizontal to the X-and Y-axes axis, and if only two coordinates of each rectangle are known, IoU can be calculated as follows:
That is, (x-axis minimum, y-axis minimum) and (x-axis maximum, y-axis maximum) coordinates are required. The area of each rectangle can then be easily obtained, and the area of the rectangle can be calculated using (x-axis maximum value – x-axis minimum value) * (y-axis maximum value – y-axis minimum value). By comparing the area of the two rectangles obtained in this manner, it is possible to obtain an IoU score, as shown in Fig. 4.
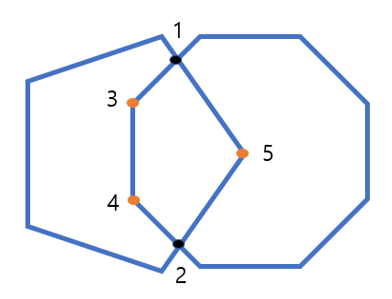
When two regions are arbitrary polygons as shown in Fig. 5, the method to obtain IoU is as follows. Find the intersection of polygons A and B, find the point in A among the vertices of B opposite to the point inside B among the vertices of A, and align the obtained vertices in a counterclockwise direction to find the area. The intersection can be determined using the sorted vertices.
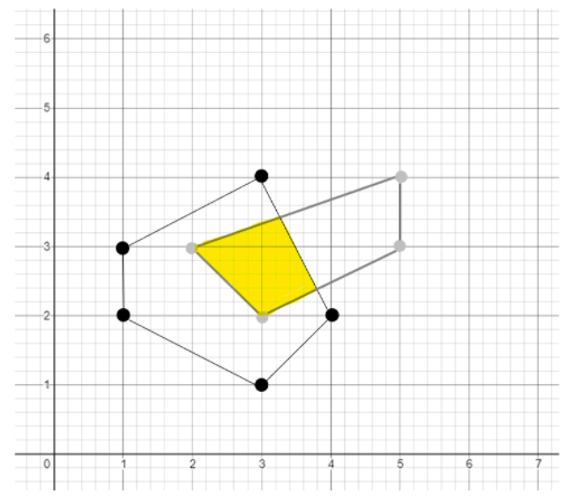
When vertices “1 and 2” are the intersection of two polygons, and “3–5” is the vertex of each polygon located inside the other polygon, if these vertices are aligned counterclockwise, it becomes 2–5–1–3–4. Using this, we find the intersection area, as shown in Fig. 6.
The method of finding the intersection of polygons A and B is to examine whether they intersect with 40 pairs of 5 line segments of A and 8 line segments of B. The algorithm used to check whether two line segments intersect is counterclockwise. Based on this algorithm, the width of the intersection was determined by calculating the area of an n-gon. When there are vertex coordinates [TeX:] $$\left(x_{1}, y_{1}\right),\left(x_{2}, y_{2}\right), \ldots,$$ [TeX:] $$\left(x_{n}, y_{n}\right),$$ to find the area of n-gon, the order of the coordinates must be in a connected form, whether clockwise or counterclockwise.
The steps include the following. Write from [TeX:] $$\left(x_{1}, y_{1}\right) \text { to }\left(x_{n}, y_{n}\right) \text { and write }\left(x_{1}, y_{1}\right)$$ once again at the end, then add the products multiplied by the diagonal components in the lower right corner, subtract the products multiplied by the diagonal components in the upper right corner, and then add 2 By dividing, the area can be calculated as follows:
(7)
[TeX:] $$A=\frac{1}{2}\left(\left|\begin{array}{ll} x_{1} & x_{2} \\ y_{1} & y_{2} \end{array}\right|+\left|\begin{array}{ll} x_{2} & x_{3} \\ y_{2} & y_{3} \end{array}\right|+\cdots\left|\begin{array}{ll} x_{n} & x_{1} \\ y_{n} & y_{1} \end{array}\right|\right)$$3.4 Contour
Contour is for detecting the edge of an object having the same color or the same pixel value (intensity), and is a method of finding the boundary line information of an area having the same color or the same pixel value.
In general, anti-outside detection techniques calculate the differential value of several images and detect the part with a large differential value as the outside. However, this method has the disadvantage of having to calculate a differential value for each image pixel. In contrast, Contour extracts a binary image from an image and detects a boundary line by checking only the existence of a value on the binary image; thus, it has the advantage of requiring a small amount of computation and is more suitable than other edge detection techniques because it extracts only the outermost information required in this study.
The Find Contours function of OpenCV outputs the contour information of the image and hierarchy information of the contour. Only black-and-white images or binarized images were used. Table 3 shows how to find the contour and the approximation method used to find the contour, which is used as shown in Fig. 7.
Table 3.
| How to find contours | Approximation method to use when finding contour | |
|---|---|---|
| Mode cv2.RETR_EXTERNAL | Detect only outlines, no hierarchical structure. | - |
| cv2RETR_LIST | Detects all contours, no hierarchical structure. | - |
| cv2.RETR_CCOMP | All contours are detected, the hierarchical structure consists of two steps. | - |
| cv2.RETR_TREE | Detect all contours and form all hierarchical structures. | - |
| Method cv2.CHAIN_APPROX-NONE | - | Returns all contour points. |
| cv2.CHAIN_APPROX-SIMPLE | - | Returns only points where contour lines can be drawn. |
| cv2.CHAIN_APPROX-TC89_L1 | - | Reduce contour points by applying Teh-Chin connection approximation algorithm L1 version. |
| cv2.CHAIN_APPROX-TC89_KCOS | - | Reduce contour points by applying Teh-Chin connection approximation algorithm KCOS version. |
4. Automated Measurement Technique Using FOV Model
For measurements, two cameras (isometric view and top view) and one high-performance height measuring sensor were installed on a 3D printer. The isometric view camera measured the overall shape of the output object, the top-view camera measured the shape retention (diffusion) of the output object, and the height sensor was used to measure the object height.
4.1 Experimental Environment
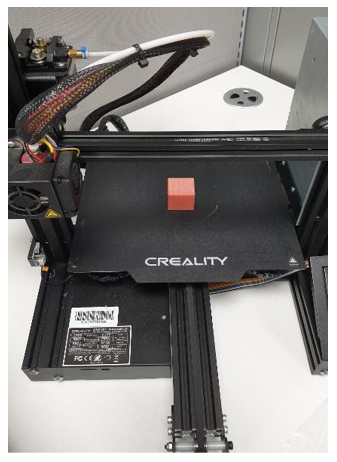
In this study, cube-shaped specimens manufactured via FDM printing were used. For measurement comparison with the existing dimensional measurement method, ABS material with the most stable printing results was adopted. Because a simple CAD model was used, post-processing was not performed. As shown in Fig. 7, the device used was the Ender-3 Pro model of Creality 3D Technology Co. Ltd., and the laminate material used for specimen production was an ABS filament with a thickness of 2.85 mm. The nozzle had a diameter of 0.4 mm, and filament extrusion speed was set to 60 mm/s, the heating bed temperature was set to [TeX:] $$60^{\circ} \mathrm{C},$$ and the filament extrusion temperature was set to [TeX:] $$210^{\circ} \mathrm{C}.$$
4.2 Data Acquisition Method for Experiments
The proposed print quality evaluation method uses the 2D area in the photo to measure and compare the acquired height of the printed object to the acquired height of the modeling through the FOV model.
4.2.1 Measurements on a 3D printer
The measured photos (top camera, isometric camera) are shown in Fig. 8. When the output from the 3D printer was finished, the height was acquired from the installed camera and height sensor.
Fig. 8.

4.2.2 Acquisition of data values in modeling
The FOV was obtained by realizing a virtual camera located at the same parameters and distance as the measuring equipment (camera) in the 3D model space. Thereafter, an FOV image (top modeling, isometric modeling as shown in Fig. 9 was obtained from the virtual camera implemented for comparison with the image obtained from the camera installed in the 3D printer.
Fig. 9.

4.3 How to Evaluate the Quality of Printouts
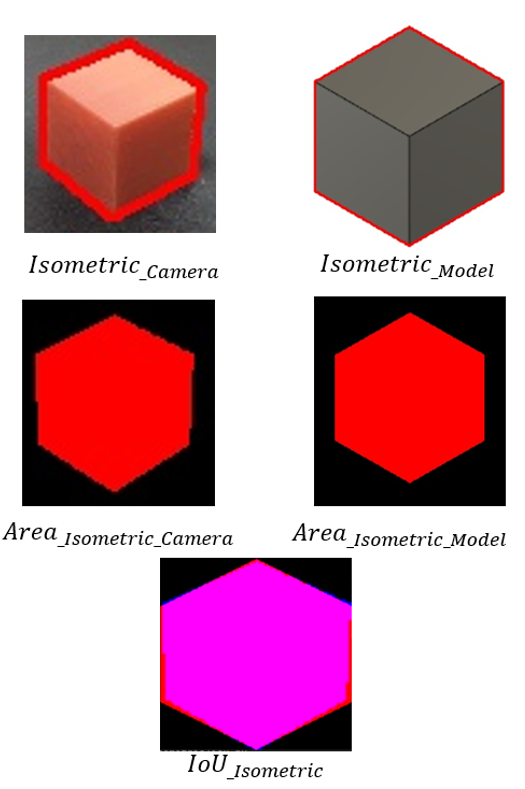
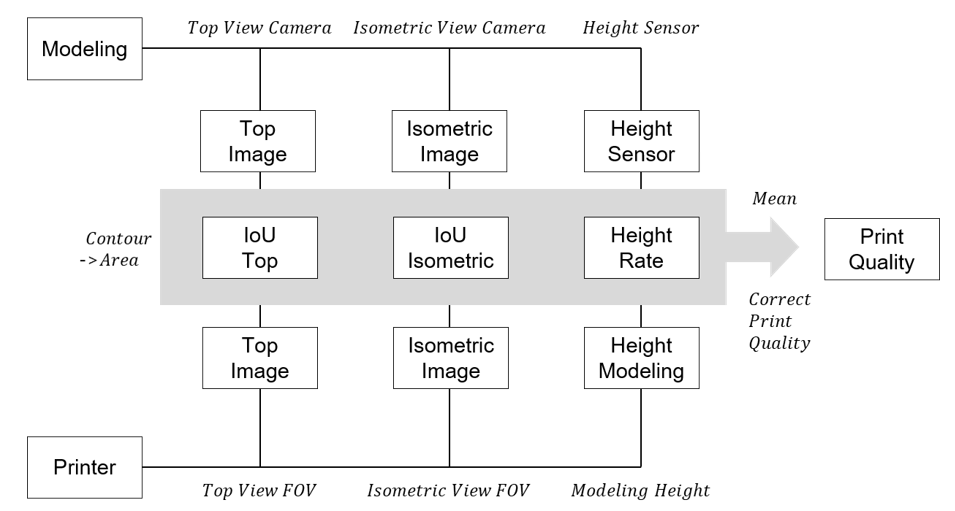
As shown in Fig. 10, the outline of the object in the image was acquired using the contour method of OpenCV. Using the outline, the 2D outermost area images [TeX:] $$\text { Area_Top_Camera Area_Isometric_Camera, }$$ [TeX:] $$\text { Area_Top_Modeling, and Area_lsometric_Modeling }$$ were acquired.
The IoU of the object area [TeX:] $$\text { Area_Camera and Area_Modeling }$$ in each view was calculated from the Top and Isometric views, respectively, and [TeX:] $$\text { IoU Top and IoU Isometric }$$ were obtained. [TeX:] $$\text { Height }_{\text {Rate }}$$ is obtained by calculating the ratio of [TeX:] $$\text { Height }{ }_{\text {Sensor }} \text { and Height }{ }_{\text {Modeling }}$$ as follows:
(8)
[TeX:] $$\text { Height }{ }_{\text {Rate }} =\left\{\begin{matrix} \frac{\text { Height }_{\text {Sensor }}}{\text { Height }_{\text {Modeling }}}& \left(\text { Height }_{\text {Sensor }}<\text { Height }{ }_{\text {Modeling }}\right) \\ 1& \left(\text { Height }_{\text {Sensor }}=H e i g h t_{\text {Modeling }}\right) \\ 2-\frac{\text { Height }_{\text {Sensor }}}{\text { Height }_{\text {Modeling }}}& \left(\text { Height }_{\text {Sensor }}>\text { Height }{ }_{\text {Modeling }}\right) \\ \end{matrix}\right.$$Finally, the quality measurement value [TeX:] $$\left(\operatorname{Print} Q \text { uality }{ }_{\text {Print }}\right)$$ was calculated by averaging the [TeX:] $$\mathrm{IoU}_{-} \mathrm{Top},\text { IoU_Isometric, and Height } \text { Rate }.$$
4.4 Measurement Calibration
The automated print quality measurement method proposed in this study is illustrated in Fig. 11. The contour area was obtained by calculating the object contours of the tower and isometric images that were obtained from the 3D printer and modeling. The IoU of the object area was obtained from the image of each view, and the height ratio was obtained from the height sensor and the height of the model. Finally, the print quality was calculated using the average the two IoU values and the height ratio. The quality calculation was corrected using Eq. (9) which is the ratio of the printed quality to the ideal quality.
(9)
[TeX:] $$\text { Print Quality }{ }_{\text {Correct }}= \frac{\text { Print Quality }{ }_{\text {Print }}}{\text { Print Quality }{ }_{\text {Ideal }}}$$The automated measurement technique was evaluated with a toy test. The results are shown in Table 4.
Table 4.
| Value | ||
|---|---|---|
| Dimensional measurement | Error (width / depth / height) | 0.076 / 0.136 / 0.226 |
| Total error rate | 0.004 | |
| Automated measurement technique | [TeX:] $$\text { Print Quality }{ }_{\text {Ideal }}$$ (top / isometric) | 0.993 / 0.981 |
| Measure IoU (top / isometric) | 0.987 / 0.966 | |
| Corrected IoU (top / isometric) | 0.994 / 0.985 | |
| Height (sensor / modeling) | 29.874 / 30.000 | |
| Height rate | 0.996 | |
| Final Print Quality (error) | 0.991 (0.008) |
5. Conclusions and Expected Effects
The conventional dimensional measurement method has a disadvantage in that it is time consuming to make the measurements. Therefore, it requires a significant amount of time and effort to build a dataset for artificial intelligence analyses related to print quality in a 3D printer. This study proposed, an automated measurement model that can have objective indicators was proposed to reduce the time consumption of existing manual measurement and the dispersion of errors in measurement. First, an image of a printed object is acquired using a camera installed in each view (top, isometric) of the printer, and height information is acquired from the sensor. Subsequently, the image is acquired by realizing the FOV with the same camera parameters at the same position as the installed camera in the modeling space, and the height information value is acquired from the modeling information value. After obtaining the contour from each acquired image, the IoU between the modeling and printed image is calculated, and the IoU measurement value corrected by considering the parameter error between the FOV and camera to obtain a more accurate IoU measurement value. Finally, the ratio of the height values obtained from the printer and model are calculated and averaged with the corrected IoU value to derive the final print quality measurement value.
This new automated measurement technique for measuring print quality is objective and requires less measurement time compared to the existing dimensional measurement method. Therefore, it is expected that it will contribute to the construction of 3D printer-related datasets sets and AI research.
6. Future Research
The method proposed in this study is suitable for a simple form. For complex shapes such as holes, the measurement method has not been validated. In future research, we plan to study an automated measurement technique that can accurately measure 3D print quality even for complex shapes.
Biography
Hyun-Ju Yoo
https://orcid.org/0000-0003-0460-3901She received her B.A. degree in international affairs from Ewha Womans University in 1995, and M.S. degree in convergence engineering, Venture Graduate School, Hoseo University, Seoul, Korea, in 2020. She is currently serving as the CEO of Top Table Inc., a 3D food printing system development company and her research interests include building a linkage system between 3D food printing and artificial intelligence.
Biography
Nammee Moon
https://orcid.org/0000-0003-2229-4217She received her B.S., M.S., and Ph.D. degrees from the School of Computer Science and Engineering at Ewha Womans University in 1985, 1987, and 1998, respectively. She served as an assistant professor at Ewha Womans University from 1999 to 2003 and as a professor of Digital Media, Graduate School of Seoul Venture Information, from 2003 to 2008. Since 2008, she has been a professor in the Department of Computer Science and Engineering at Hoseo University. Her current research interests include social learning, HCI, user-centric data, artificial intelligence, and big-data processing and analysis.
References
- 1 M. B. Mawale, A. M. Kuthe, S. W. Dahake, "Additive layered manufacturing: state-of-the-art applications in product innovation," Concurrent Engineering, vol. 24, no. 1, pp. 94-102, 2016.doi:[[[10.1177/1063293X15613111]]]
- 2 J. L. Fastowicz, K. Okarma, "Quality assessment of photographed 3D printed flat surfaces using hough trnasform and histogram equalizaiton," Journal of Universal Computer Science, vol. 25, no. 6, pp. 701-717, 2019.custom:[[[-]]]
- 3 O. A Mohamed, S. H. Masood, J. L. Bhowmik, "Optimization of fused deposition modeling process parameters: a review of current research and future prospects," Advances in Manufacturing, vol. 3, no. 1, pp. 42-53, 2015.doi:[[[10.1007/s40436-014-0097-7]]]
- 4 J. S. Kim, N. Jo, J. S. Nam, S. W. Lee, "Identification and optimization of dominant process parameters affecting mechanical properties of FDM 3D printed parts," Transactions of the Korean Society of Mechanical Engineers A, vol. 41, no. 7, pp. 607-612, 2017.doi:[[[10.3795/KSME-A.2017.41.7.607]]]
- 5 F. M. Mwerma, E. T. Akinlabi, O. S. Fatoba, "Visual assessment of 3D printed elements: a practical quality assessment for home-made FDM products," Materials Today: Proceedings, vol. 26(Part 2), pp. 1520-1525, 2020.doi:[[[10.1016/j.matpr.2020.02.313]]]
- 6 C. S. Lee, "A study on parametric optimization and health monitoring for fused deposition modeling (FDM) process," M.S. thesis, Sungkyunkwan University, Suwon, Korea, 2018.custom:[[[-]]]
- 7 P. Charalampous, I. Kostavelis, T. Kontodina, D. Tzovaras, "Learning-based error modeling in FDM 3D printing process," Rapid Prototyping Journal, vol. 27, no. 3, pp. 507-517, 2021.doi:[[[10.1108/rpj-03-2020-0046]]]
- 8 A. K. Sood, A. Equbal, V. Toppo, R. K. Ohdar, S. S. Mahapatra, "An investigation on sliding wear of FDM built parts," CIRP Journal of Manufacturing Science and Technology, vol. 5, no. 1, pp. 48-54, 2012.doi:[[[10.1016/j.cirpj.2011.08.003]]]
- 9 G. C. V osniakos, T. Maroulis, D. Pantelis, "A method for optimizing process parameters in layer-based rapid prototyping," Proceedings of the Institution of Mechanical EngineersPart B: Journal of Engineering Manufacture, vol. 221, no. 8, pp. 1329-1340, 2007.doi:[[[10.1243/09544054jem815]]]
- 10 A. Equbal, A. K. Sood, S. S. Mahapatra, "Prediction of dimensional accuracy in fused deposition modelling: a fuzzy logic approach," International Journal of Productivity and Quality Management, vol. 7, no. 1, pp. 22-43, 2011.doi:[[[10.1504/ijpqm.2011.037730]]]
- 11 A. K. Sood, R. K. Ohdar, S. S. Mahapatra, "Parametric appraisal of fused deposition modelling process using the grey Taguchi method," Proceedings of the Institution of Mechanical EngineersPart B: Journal of Engineering Manufacture, vol. 224, no. 1, pp. 135-145, 2010.doi:[[[10.1243/09544054jem1565]]]
- 12 G. C. V osniakos, T. Maroulis, D. Pantelis, "A method for optimizing process parameters in layer-based rapid prototyping," Proceedings of the Institution of Mechanical EngineersPart B: Journal of Engineering Manufacture, vol. 221, no. 8, pp. 1329-1340, 2007.doi:[[[10.1243/09544054jem815]]]
- 13 A. K. Sood, R. K. Ohdar, S. S. Mahapatra, "Experimental investigation and empirical modelling of FDM process for compressive strength improvement," Journal of Advanced Research, vol. 3, no. 1, pp. 81-90, 2012.doi:[[[10.1016/j.jare.2011.05.001]]]
